Dragon Wall Pet Door - Installation Instructions
Installation Instructions

 Difficulty
Difficult
Difficulty
Difficult
 Steps
21
Steps
21
 Time Required
3 - 4 hours
Time Required
3 - 4 hours
 Sections
04
Sections
04
 Flags
03
Flags
03
Parts
- Flap and Frame Assembly
- 1 Locking Cover - rectangular sheet with a hole near the top
- 2 Tall Tunnel Sections - black, rectangular sheets
- 2 Short Tunnel Sections - black, rectangular sheets
- 4 Tunnel Corner Guides - black, corner profile sticks
- 8 Frame Screws – 1-3/4” long, #10 wood screws
- 8 Frame Washers – steel 9/16” washers
Tools & Materials
- 2x4 lumber (at least 6ft)
- Construction screws (8)
- Hammer drill
- Impact driver
- 5/16” or 3/8” masonry drill bit longer than your wall thickness
- Level
- Drywall saw
- Jigsaw
- Circular saw
- Painter’s tape
- Pencil
Please read instructions & notes thoroughly before installation. If you are not completely comfortable cutting a hole in your home, we highly recommend hiring a professional.
Required Skills: Locating studs inside of your wall, cutting standard lumber to length, cutting level and precise openings through your interior and exterior walls, toenailing lumber.
Step 1 Confirm Measurements and Locate Studs
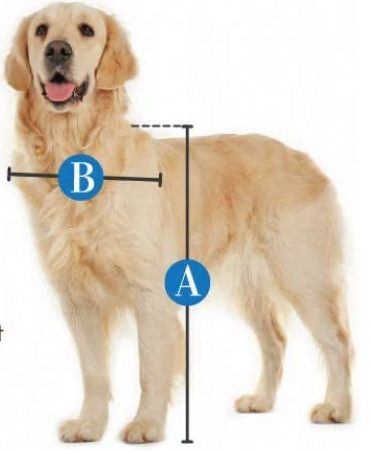
- If you have not yet measured your pet, see this guide to ensure the pet door will work.
- Locate the studs on either side of where you want to install your wall pet door and mark with a pencil or painter's tape.
Step 2 Tape the Template to the Wall

- Tape the installation template to your interior wall centered between the adjacent studs.
- Check the template top edge with a level.
Step 3 Mark the Outline

- Mark the physical outline of the template with a sharp pencil. Remove the template.
- Drill and saw out a small test square in the middle to check for wire/pipes in the installation area.
- Make adjustments as necessary.
Step 4 Drill the Holes

- With a 5/16” or 3/8” drill bit (5/16” preferred) drill through just the interior wall on the corners of the template outline with the center of the bit directly on the outline’s corners.
Step 5 Make the Rough Cutout

- Place your jigsaw blade or drywall saw into the holes and cut along the lines you drew in Step 3 for the interior wall.
- Remove any insulation to expose the back of the exterior wall.
- Measure where your cutout is relative to the floor of the inside of your wall and where one side edge is relative to an adjacent stud.
Step 6 Mark the Template Outlines
- Mark on the back of the exterior wall (looking from the inside) where to put the template based on your measurements, then redraw at least the corners of the outline.
Step 7 Drill the Holes
- Drill straight through the corners of the outline from the inside wall. These should line up with your original holes.
Step 8 Cut the External Wall
- Use a circular saw or jigsaw to cut the external wall.
- It is possible you may need a different tool depending on the wall’s construction.
Step 9 Cut Tunnel Sections with a Saw or Scissors.

- Measure your total interior to exterior wall thickness.
- Add or Subtract to the total wall thickness
- Cut the width (see diagram) of all four pieces to this length. If you have square pieces you can cut either edge.
Step 10 Cut Corner Guides.

- Take your total wall thickness again and subtract 2-1/8”.
- Cut all four of your corner guides to this length with a jigsaw or hacksaw.
Step 11 Test fit the tunnel.

- Lay the inside frame face down on the floor. If you have a single flap, the frame without the flap installed is the inside frame and the other is the outside frame. If you have a double flap, the frames are identical and interchangeable, you can pick which is which.
- Fit the tunnel section pieces onto the inside frame.
Step 12 Fit the Corner Guides

- Press fit the corner guides all the way onto the tunnel section pieces with the corner guide positioned as close to the frame as possible.
Step 13 Tape the Tunnel

- Tape together the corners of the tunnel where pieces meet after the guides. Take out the tunnel, tape the corners that were in the inside frame, then put the tunnel back in the inside frame.
Step 14 Connect the Frames

- Place the outside frame on top.
- Remove the frames once you’re familiar with how they fit together, but keep the tunnel assembled.
Step 15 Fasten Installation Lumber Inside the Wall

- Cut four 14” sections of 2x4, or however long spans between studs.
- Place one of the 2x4s inside the wall as shown in the image to the right. Place it horizontally and flat against the inside of the wall with the wide side of the 2x4 against the wall.
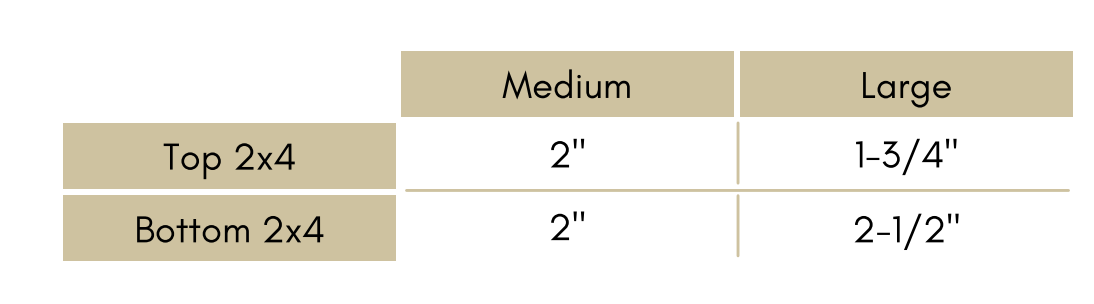
- Raise the 2x4 so that it is visible in the rough cutout. The table below shows how much should be visible depending on whether it's on the top or the bottom, and whether you have a medium or large flap.
Step 16 Secure the Lumber

- Secure the 2x4 by toe nailing it into the adjacent studs.
- Repeat steps 13 through 15 for the other three 2x4s so that there are two on the top and two on the bottom, ensuring they are level with each other.
Step 17 Fit the frame

- Insert the inside frame, ensuring the frame covers the entire rough cutout.
- Tape the frame securely to your wall and then insert the tunnel into the frame.
Step 18 Check the Framing Lumber

- Check that the 2x4s can be seen straight-on through the frame screw holes.
- If you can see the 2x4s, the frame covers the rough cutout, and the tunnel fits, you’re set to continue.
Step 19 Drill Pilot Holes

- Make pilot hole markings on the 2x4s where the frame screws will go. You can use the frame screws to make indentations if you can’t get a pencil all the way through.
- Repeat steps b and c for the other three 2x4s so that there are two on the top and two on the bottom, ensuring they are level with each other.
- Remove the frame and tunnel then drill pilot holes with a 1/8" drill bit.
Step 20 Fasten Frame to Installation Lumber

- Place the inside frame and tunnel back into the rough cutout, taped to the wall.
- On each of the four screw holes, place a washer over the frame wood screw and then loosely screw the provided wood screws into the pilot holes.
- Once each screw has engaged their pilot holes, go back and tighten down each screw only until the frame is sturdily flush with your wall. Check that your frame remains level as you go.
- Remove the tape holding the frame to the wall.
Step 21 Install the Outside Frame

- Repeat steps 18 through 20 but with the outside frame, fitting it into the tunnel. Make sure none of the tunnel pieces are loose before you fasten.
- Remove any remaining tape.
- If the frame positions need to be adjusted, loosen screws, make the adjustments, and tighten back down.
- Ensure the frames are flush with your wall, are level, and are sturdy.
- With a silicone sealant of your choice, we recommend sealing any gaps on the corners of the inside of the frames, as well as anywhere the tunnel sections and guides meet.
Large Wall Mounts Install the Hole Plugs

- If you have a Large Size Wall Mount, install the hole plugs to cover the exposed screws holes.