


High Tech Armor Flex Patio Pet Door

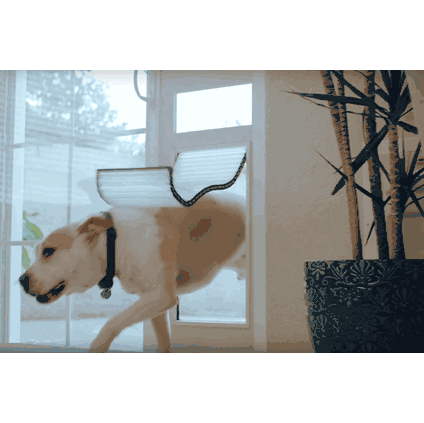

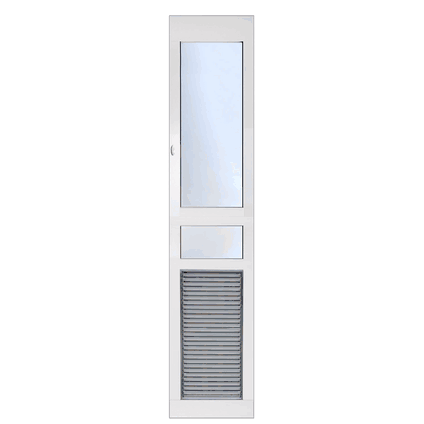


- Energy-efficient patio pet door designed for sliding glass doors with a flexible flap.
- Quiet flap that is made of multiple horizontal plastic slats with magnets.
- Magnetic airtight seal withstands high winds while being easy for dogs to use.
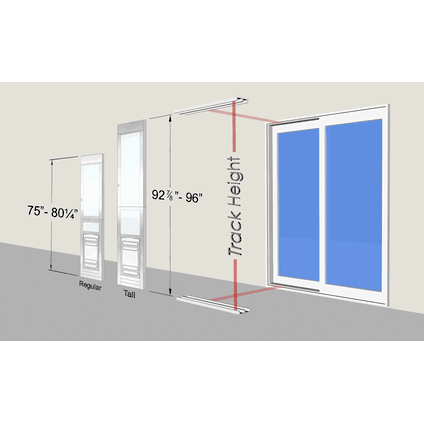
- Aluminum-framed panel comes in adjustable height ranges for simple installation.
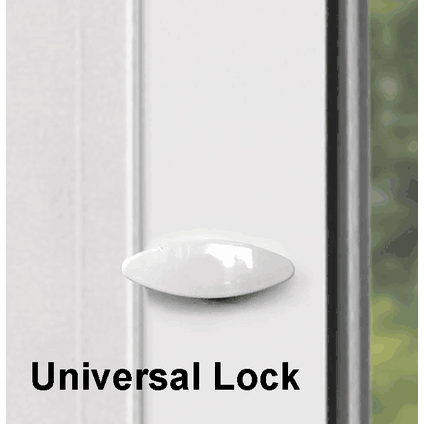
- Universal lock system compatible with any sliding door lock for added security.
- Available in sizes ranging from small to extra large for various pet sizes.
 Product Details
Product Details
Integrating convenience and energy efficiency, the High Tech Armor Flex Patio Pet Door is an ideal solution for pet owners who want to provide their pets with the freedom to roam. This pet door is designed for sliding glass doors and features a flexible flap that's easy for dogs to use. It boasts a magnetic airtight seal, ensuring that your home remains insulated even in high winds or extreme weather conditions.
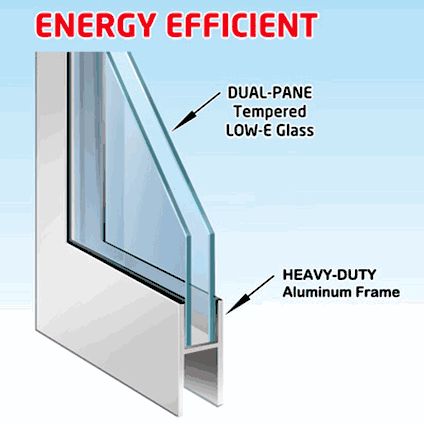
Constructed with an aluminum frame, the High Tech Armor Flex Patio Pet Door is built to last and can withstand heavy use. The adjustable height ranges make installation a breeze, while the double-pane, Low-E glass ensures maximum energy efficiency. Moreover, the pet door comes with stainless steel hardware, a universal lock system that's compatible with any sliding door lock, and an ABS plastic locking cover for added security.
Available in sizes from small to extra large, the High Tech Armor Flex Patio Pet Door can accommodate pets of various sizes. Its unique flap design, which incorporates a matrix of rare earth magnets, remains closed even in high winds, and is designed with pet comfort and weather resistance in mind. Enjoy the convenience and durability of this high-quality pet door, and give your furry friends the freedom they deserve.
Features:
- Matrix of rare earth magnets ensures flap remains closed in high winds.
- Double-pane, Low-E glass enhances energy-efficiency and insulation.
- Durable aluminum framing built to withstand heavy use and last a lifetime.
- Includes stainless steel hardware, universal lock, and ABS plastic locking cover for security.
- Unique flap design prioritizes pet comfort and resists extreme weather conditions.
Benefits:
- Energy-efficient design ensures that your home stays insulated year-round.
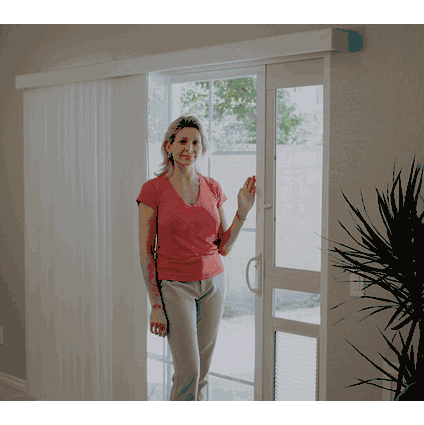
- Tools-free installation makes it perfect for renters and vacation homes.
- Larger sizes allow pets of differing sizes to share the pet door.
- Built to last a lifetime.


Size Chart
- Small 6.38"w x 13.5"h
- Medium 8.25"w x 17.25"h
- Large 10.5"w x 21.25"h
- Extra Large 12.5"w x 25"h
Flap Dimensions:
6.38"w x 13.5"h
The entry way your dog goes through.Step-Over:
4.5”
Distance from the bottom of the flap to the floor you pet must step over to enter the pet door.


Overall Panel Width:
11.82"
How wide the panel is overall.Flap Dimensions:
8.25"w x 17.25"h
The entry way your dog goes through.Step-Over:
6.5"
Distance from the bottom of the flap to the floor you pet must step over to enter the pet door. Overall Panel Width:
13.72"
How wide the panel is overall.Flap Dimensions:
10.5"w x 21.25"h
The entry way your dog goes through.Step-Over:
6.5”
Distance from the bottom of the flap to the floor you pet must step over to enter the pet door. Overall Panel Width:
15.84"
How wide the panel is overall.Flap Dimensions:
12.5"w x 25"h
The entry way your dog goes through.Step-Over:
10.5”
Distance from the bottom of the flap to the floor you pet must step over to enter the pet door. Overall Panel Width:
18”
How wide the panel is overall.| Flap Size | Height Option | Flap Dimension | Panel Height | Step-Over | Panel Width | Recommended Pet Height |
|---|---|---|---|---|---|---|
| Small | Regular | 6.38" w x 13.5" h | 77" - 80.25" | 4.5" | 11.82" | 12" - 18" |
| Tall | 6.38" w x 13.5" h | 92.75" - 96" | 4.5" | |||
| Medium | Regular | 8.25" w x 17.25" h | 77" - 80.25" | 6.5" | 13.72" | 12" - 24" |
| Tall | 8.25" w x 17.25" h | 92.75" - 96" | 6.5" | |||
| Large | Regular | 10.5" w x 21.25" h | 77" - 80.25" | 6.5" | 15.84" | 12" - 30" |
| Tall | 10.5" w x 21.25" h | 92.75" - 96" | 6.5" | |||
| Extra Large | Regular | 12.5" w x 25" h | 77" - 80.25" | 10.5" | 18" | 12" - 36" |
| Tall | 12.5" w x 25" h | 92.75" - 96" | 10.5" |
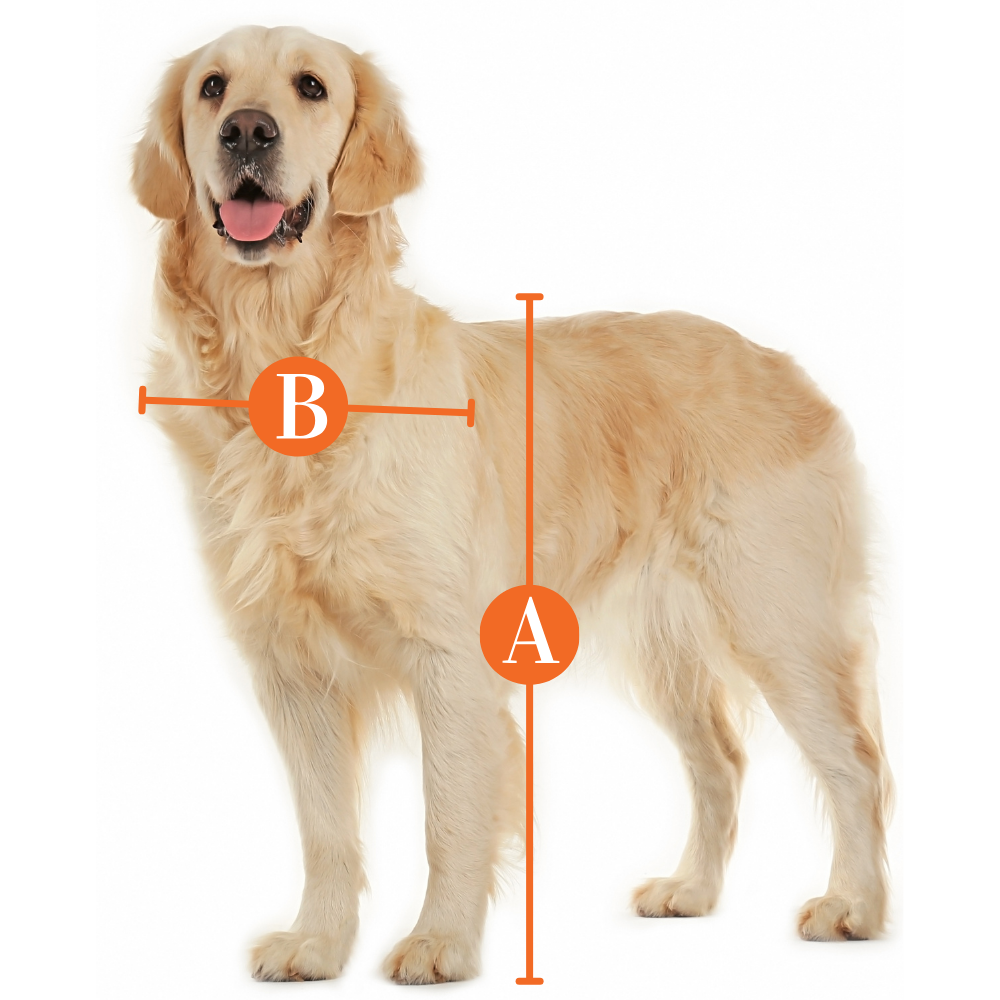
Find The Best Pet Door Size For My Pet

A
Pet Height: inches
B
Pet Width: inches
Installation Instructions
Click here for a printable PDF of the Armor Flex Patio Pet Door Instructions.

 Difficulty
Moderate
Difficulty
Moderate
 Steps
21
Steps
21
 Time Required
1-2 hours
Time Required
1-2 hours
 Sections
02
Sections
02
 Flags
00
Flags
00
Parts
- Top Panel Assembly
- Bottom Panel Assembly
- Locking Cover
- MS-4 Ultrasonic Collar or MS-5 Collar Kit
- AC Adapter
- Range Knobs (2)
- 5/8" Weather Stripping
- 2" Draft Stopper Seal
- Section Connectors (2)
- Door Lock Housing(1)
- Lock Handle (1)
- Lock Hasp (1)
- House Lock Tab (2)
- Vacation Lock (1)
- Rectangular Hole Plug (1)
- Round Hold Plug (2)
- 1/16 Allenwrench
- 1/8 Allenwrench
- 1/4-20 X 1/2 flat head machine screw (8)
- #8 X 5/8 round head sheet metal screw (4)
- #6 X 1/2 round head sheet metal screw (6)
- #4 X 3/8 flat head sheet metal screw (4)
Tools
- Size #1 Phillips screwdriver
- Electric drill
- #32 (.117”) drill bit
- 3/32” drill bit
- 1/4 drill bit
- Scissors
- Tape Measure
- Pencil
- Safety Glasses
Please read instructions & notes thoroughly before installation.
Step 1 Measure Track

- Measure from the inside bottom of your sliding glass door track to the inside top. For short installations, remove Riser Extension.
- If your sliding glass door frame measures between 75” and 77” high, remove the Riser Extension on the Bottom Panel Assembly by unscrewing the connector screws on each side of the Riser Extension.
- The aluminum Riser Extension may be recycled.For patio doors taller than 77”, do not remove the extension.
Step 2 Insert Connectors

- Insert Section Connectors on the Bottom Frame Assembly panelusing (2)1/4-20 X 1/2 flat head machine screws for each Section Connector.
Step 3 Insert frame assembly

- Insert Top Frame Assembly on to Bottom Frame Assembly.
Step 4 Install Screws

- Install Section Connector screws. Screw panels together using (2) 1/4-20 X 1/2 flat head machine screws for each Section Connector.
Step 5 Loosen top screws

- Loosen the Top Slider set screws.
- Loosen the Top Slider locking set screws on the left and right sides of the Top Panel Assembly using the 1/8” allen wrench provided.
- If the Top Slider does not immediately release, push it up by hand so that it slides to its highest position.
Step 6 Check Lock Holes

- Make sure the lock holes in the Top Frame Assembly are facing the inside of your home.
- Position the pet door assembly into your sliding glass door frame by first inserting the pet door Bottom Panel into the bottom of your door track so that the Semicircular grooves in the pet door Bottom Panel are placed over the sliding rail at the base of your sliding glass door track.
- Tilt the pet door assembly up. Pull down on the Top Slider. Insert the Top Slider into the top of your door track and release, allowing it to move up into the top of the track.
Step 7 Install House Lock tab

- Install a House Lock Tab on the wall side of the pet door by screwing(2) #6 X ½” round head sheet metal screws into the pre-drilled holes on the pet door. Position the Tab with the open end pointing downward as shown.
Step 8 Mark Height

- Mark the height of the House Lock Tab on your sliding glass door track.
- Measure from the sliding rail at the base of your door track to a height of 46 5/8” if you are using the Riser Extension or 445/8” if you are not using the Riser Extension.
- Mark this height on the inside of your door track. Remove the tape liner from a House Lock Tab and Position the top of the non-drilled end at this mark.
Step 9 Drill Holes

- Drill (2) holes into your door track using a 1/16” drill bit.
- Screw the Lock House Tab to your door track using (2) #6 X1/2” screws.
Step 10 Install Hole Plugs

- Install a Round Hole Plug in the unused Lock Hole on the side of the pet door assembly which butts against your sliding glass door track. This is the side that does not require the lock.
- If you chose not to use the Universal Lock Assembly, install a Round Hole Plug in both Lock Knob Holes.
Step 11 Install into Track

- Slide the assembled pet door so that it buttsup against the inside of your sliding glass door track.
- Firmly grab the pet door from the inside and outside. Lift up and push against the sliding glass door track letting the House Lock Tabs engage each other as the door frame drops into its final position.
Step 12 Tighten Top Screws

- Once your Door Assembly is in place, you will have access to the Top Slider Set Screw on the side facing your sliding glass door.
- Tighten the set screw using the 1/8” Allen Wrench. This will lock the Top Slider in place.
Step 13 Insert Rectangular Hole Plug

- If you choose not to use the Universal Lock Assembly, install the Rectangular Hole Plug in the lock cavity on the open side of the assembled door panel.
- This will allow you to apply weather stripping over the cavity.If you will be installing the Universal Lock, skip this step and proceed.
Step 14 Insert Door Lock Housing

- Insert Door Lock Housing on the open side of the assembled pet door panel so that the Lock Arm is in the up position when open.
Step 15 Install Lock Handle

- Install the Lock Handle so that the handle is vertical when the lock is open (Lock Arm is in up position.) and so that one of the detents in the Lock Handle shaft aligns with the Lock Arm Set Screw.
- Turning the Lock Handle counter-clockwise should move the Lock Arm to the closed position.If the Lock Knob does not easily insert into the Lock Arm, loosen the Lock Arm Set Screw.
- Note that there are (2) detents in the Lock Knob for left and right opening door opening sliding glass doors. Make sure the handle is oriented vertically and that one of the detents aligns with the Lock Arm Set Screw.
Step 16 Tighten Lock Arm

- Tighten the Lock Arm set screw using the 1/16” Allen Wrench provided. Note that there should be a sight gap between the Lock Knob and the patio pet door panel when the unit is assembled correctly.
Step 17 Insert Lock Hasp

- Insert the Lock Hasp into the Door Lock Housing. Note that the Lock Hasp must be held vertically with the longer section uptop. Turn the Lock Handle counterclockwise so that the Lock Hasp is trapped in the Door Lock Assembly.
- Then, remove the protective liner from the tape on the back of the Lock Hasp.
Step 18 Close Patio Door

- Slide your patio door closed so that the Lock Hasp tape makes contact and affixes to the sliding glass door. Turn the Lock Handle clockwise, releasing the Lock Hasp and open your sliding glass door.
- The Lock Hasp should now be affixed to your sliding glass door.
Step 19 Drill Holes

- Using the 3/32”drill bit drill (2) holes within the slots of the Lock Hasp. Attach the Lock Hasp to your sliding glass door with (2) #6 X 1/2 round head sheet metal screws.
Step 20 Install Weatherstripping

- Peal the adhesive backing from the first 2 inches of the weather stripping.
- Starting at the bottom, apply the weather stripping to the inside edge of the open side of the assembled door panel removing the adhesive backing as you move up.
- If using the Universal Lock Assembly, cut at the bottom of the lock and restart above the lock. Continue to the top of the Top Frame Assembly and cut.
Step 21 Install Draft Stopper

- You will need to apply the Draft Stopper seal to the inside of your sliding glass door to seal the opening between your sliding door and the stationary glass.
- Start at the top of your sliding glass door and apply the seal removing the adhesive backing as you move down. When you reach the bottom, cut the remaining seal material with scissors.
Installing the Vacation Lock:
Step 1:
Drill the Vacation Lock bolt hole. Position the Vacation Lock on the edge of your sliding glass door at the top or bottom with the Locking Bolt extended.
The end of the bolt should be facing your stationary door track. Using a pencil, trace around the circumference of the bolt on the stationary sliding glass door frame. Then Remove the Vacation Lock and mark the approximate center position of the bolt.Drill a 1/4-inch hole in your stationary sliding glass door frame for the bolt.
Step 2:
The Vacation Lock provides added security. It may be attached to you sliding glass door at the top or bottom. With the bolt extended and inserted into the drilled hole, position the Vacation Lock onto edge of your sliding glass door and, with a pencil, trace the slots of the Vacation Lock onto the edge of your sliding glass door.
Note: Before drilling, Retract the bolt and make sure there is clearance between the retracted bolt and your stationary door frame. Reposition the Vacation Lock if necessary, to make sure there is clearance but,also making sure that the bolt is still centered on the hole. Drill (2) holes in your sliding glass door using a #32 drill bit, one hole in the center of each of the slots you marked.
Step 3:
Fasten the Vacation Lock to your sliding glass door using (2) #8 X 5/8 round head sheet metal screws.
Warranty
Warranty Type: Limited
Duration: One year from the original delivery date for all products except collar key batteries. Collar key batteries are not covered.
Coverage:
Repair or replacement for products that fail to operate within one year of the original delivery date.
Shipping of repaired or replaced products back to the customer via FedEx Ground or USPS priority mail is covered by High Tech Pet Products.
Exclusions:
Cleaning charges: Products returned dirty or with pet hair will incur a charge equal to 25% of the original purchase price.
Customer is responsible for the cost of shipping the defective product to High Tech Pet Products.
Expedited shipping requests for replacements are at the customer's expense.
All products, including pet doors, must be returned and examined before a replacement unit is sent.
Customer Reviews
Size Chart
- Small 6.38"w x 13.5"h
- Medium 8.25"w x 17.25"h
- Large 10.5"w x 21.25"h
- Extra Large 12.5"w x 25"h
Flap Dimensions:
6.38"w x 13.5"h
The entry way your dog goes through.Step-Over:
4.5”
Distance from the bottom of the flap to the floor you pet must step over to enter the pet door. Overall Panel Width:
11.82"
How wide the panel is overall.Flap Dimensions:
8.25"w x 17.25"h
The entry way your dog goes through.Step-Over:
6.5"
Distance from the bottom of the flap to the floor you pet must step over to enter the pet door. Overall Panel Width:
13.72"
How wide the panel is overall.Flap Dimensions:
10.5"w x 21.25"h
The entry way your dog goes through.Step-Over:
6.5”
Distance from the bottom of the flap to the floor you pet must step over to enter the pet door. Overall Panel Width:
15.84"
How wide the panel is overall.Flap Dimensions:
12.5"w x 25"h
The entry way your dog goes through.Step-Over:
10.5”
Distance from the bottom of the flap to the floor you pet must step over to enter the pet door. Overall Panel Width:
18”
How wide the panel is overall.| Flap Size | Height Option | Flap Dimension | Panel Height | Step-Over | Panel Width | Recommended Pet Height |
|---|---|---|---|---|---|---|
| Small | Regular | 6.38" w x 13.5" h | 77" - 80.25" | 4.5" | 11.82" | 12" - 18" |
| Tall | 6.38" w x 13.5" h | 92.75" - 96" | 4.5" | |||
| Medium | Regular | 8.25" w x 17.25" h | 77" - 80.25" | 6.5" | 13.72" | 12" - 24" |
| Tall | 8.25" w x 17.25" h | 92.75" - 96" | 6.5" | |||
| Large | Regular | 10.5" w x 21.25" h | 77" - 80.25" | 6.5" | 15.84" | 12" - 30" |
| Tall | 10.5" w x 21.25" h | 92.75" - 96" | 6.5" | |||
| Extra Large | Regular | 12.5" w x 25" h | 77" - 80.25" | 10.5" | 18" | 12" - 36" |
| Tall | 12.5" w x 25" h | 92.75" - 96" | 10.5" |
Find The Best Pet Door Size For My Pet
A
Pet Height: inches
B
Pet Width: inches
Installation Instructions
Click here for a printable PDF of the Armor Flex Patio Pet Door Instructions.
Difficulty
Moderate
Steps
21
Time Required
1-2 hours
Sections
02
Flags
00
Parts
- Top Panel Assembly
- Bottom Panel Assembly
- Locking Cover
- MS-4 Ultrasonic Collar or MS-5 Collar Kit
- AC Adapter
- Range Knobs (2)
- 5/8" Weather Stripping
- 2" Draft Stopper Seal
- Section Connectors (2)
- Door Lock Housing(1)
- Lock Handle (1)
- Lock Hasp (1)
- House Lock Tab (2)
- Vacation Lock (1)
- Rectangular Hole Plug (1)
- Round Hold Plug (2)
- 1/16 Allenwrench
- 1/8 Allenwrench
- 1/4-20 X 1/2 flat head machine screw (8)
- #8 X 5/8 round head sheet metal screw (4)
- #6 X 1/2 round head sheet metal screw (6)
- #4 X 3/8 flat head sheet metal screw (4)
Tools
- Size #1 Phillips screwdriver
- Electric drill
- #32 (.117”) drill bit
- 3/32” drill bit
- 1/4 drill bit
- Scissors
- Tape Measure
- Pencil
- Safety Glasses
Please read instructions & notes thoroughly before installation.
Step 1 Measure Track
- Measure from the inside bottom of your sliding glass door track to the inside top. For short installations, remove Riser Extension.
- If your sliding glass door frame measures between 75” and 77” high, remove the Riser Extension on the Bottom Panel Assembly by unscrewing the connector screws on each side of the Riser Extension.
- The aluminum Riser Extension may be recycled.For patio doors taller than 77”, do not remove the extension.
Step 2 Insert Connectors
- Insert Section Connectors on the Bottom Frame Assembly panelusing (2)1/4-20 X 1/2 flat head machine screws for each Section Connector.
Step 3 Insert frame assembly
- Insert Top Frame Assembly on to Bottom Frame Assembly.
Step 4 Install Screws
- Install Section Connector screws. Screw panels together using (2) 1/4-20 X 1/2 flat head machine screws for each Section Connector.
Step 5 Loosen top screws
- Loosen the Top Slider set screws.
- Loosen the Top Slider locking set screws on the left and right sides of the Top Panel Assembly using the 1/8” allen wrench provided.
- If the Top Slider does not immediately release, push it up by hand so that it slides to its highest position.
Step 6 Check Lock Holes
- Make sure the lock holes in the Top Frame Assembly are facing the inside of your home.
- Position the pet door assembly into your sliding glass door frame by first inserting the pet door Bottom Panel into the bottom of your door track so that the Semicircular grooves in the pet door Bottom Panel are placed over the sliding rail at the base of your sliding glass door track.
- Tilt the pet door assembly up. Pull down on the Top Slider. Insert the Top Slider into the top of your door track and release, allowing it to move up into the top of the track.
Step 7 Install House Lock tab
- Install a House Lock Tab on the wall side of the pet door by screwing(2) #6 X ½” round head sheet metal screws into the pre-drilled holes on the pet door. Position the Tab with the open end pointing downward as shown.
Step 8 Mark Height
- Mark the height of the House Lock Tab on your sliding glass door track.
- Measure from the sliding rail at the base of your door track to a height of 46 5/8” if you are using the Riser Extension or 445/8” if you are not using the Riser Extension.
- Mark this height on the inside of your door track. Remove the tape liner from a House Lock Tab and Position the top of the non-drilled end at this mark.
Step 9 Drill Holes
- Drill (2) holes into your door track using a 1/16” drill bit.
- Screw the Lock House Tab to your door track using (2) #6 X1/2” screws.
Step 10 Install Hole Plugs
- Install a Round Hole Plug in the unused Lock Hole on the side of the pet door assembly which butts against your sliding glass door track. This is the side that does not require the lock.
- If you chose not to use the Universal Lock Assembly, install a Round Hole Plug in both Lock Knob Holes.
Step 11 Install into Track
- Slide the assembled pet door so that it buttsup against the inside of your sliding glass door track.
- Firmly grab the pet door from the inside and outside. Lift up and push against the sliding glass door track letting the House Lock Tabs engage each other as the door frame drops into its final position.
Step 12 Tighten Top Screws
- Once your Door Assembly is in place, you will have access to the Top Slider Set Screw on the side facing your sliding glass door.
- Tighten the set screw using the 1/8” Allen Wrench. This will lock the Top Slider in place.
Step 13 Insert Rectangular Hole Plug
- If you choose not to use the Universal Lock Assembly, install the Rectangular Hole Plug in the lock cavity on the open side of the assembled door panel.
- This will allow you to apply weather stripping over the cavity.If you will be installing the Universal Lock, skip this step and proceed.
Step 14 Insert Door Lock Housing
- Insert Door Lock Housing on the open side of the assembled pet door panel so that the Lock Arm is in the up position when open.
Step 15 Install Lock Handle
- Install the Lock Handle so that the handle is vertical when the lock is open (Lock Arm is in up position.) and so that one of the detents in the Lock Handle shaft aligns with the Lock Arm Set Screw.
- Turning the Lock Handle counter-clockwise should move the Lock Arm to the closed position.If the Lock Knob does not easily insert into the Lock Arm, loosen the Lock Arm Set Screw.
- Note that there are (2) detents in the Lock Knob for left and right opening door opening sliding glass doors. Make sure the handle is oriented vertically and that one of the detents aligns with the Lock Arm Set Screw.
Step 16 Tighten Lock Arm
- Tighten the Lock Arm set screw using the 1/16” Allen Wrench provided. Note that there should be a sight gap between the Lock Knob and the patio pet door panel when the unit is assembled correctly.
Step 17 Insert Lock Hasp
- Insert the Lock Hasp into the Door Lock Housing. Note that the Lock Hasp must be held vertically with the longer section uptop. Turn the Lock Handle counterclockwise so that the Lock Hasp is trapped in the Door Lock Assembly.
- Then, remove the protective liner from the tape on the back of the Lock Hasp.
Step 18 Close Patio Door
- Slide your patio door closed so that the Lock Hasp tape makes contact and affixes to the sliding glass door. Turn the Lock Handle clockwise, releasing the Lock Hasp and open your sliding glass door.
- The Lock Hasp should now be affixed to your sliding glass door.
Step 19 Drill Holes
- Using the 3/32”drill bit drill (2) holes within the slots of the Lock Hasp. Attach the Lock Hasp to your sliding glass door with (2) #6 X 1/2 round head sheet metal screws.
Step 20 Install Weatherstripping
- Peal the adhesive backing from the first 2 inches of the weather stripping.
- Starting at the bottom, apply the weather stripping to the inside edge of the open side of the assembled door panel removing the adhesive backing as you move up.
- If using the Universal Lock Assembly, cut at the bottom of the lock and restart above the lock. Continue to the top of the Top Frame Assembly and cut.
Step 21 Install Draft Stopper
- You will need to apply the Draft Stopper seal to the inside of your sliding glass door to seal the opening between your sliding door and the stationary glass.
- Start at the top of your sliding glass door and apply the seal removing the adhesive backing as you move down. When you reach the bottom, cut the remaining seal material with scissors.
Installing the Vacation Lock:
Step 1:
Drill the Vacation Lock bolt hole. Position the Vacation Lock on the edge of your sliding glass door at the top or bottom with the Locking Bolt extended.
The end of the bolt should be facing your stationary door track. Using a pencil, trace around the circumference of the bolt on the stationary sliding glass door frame. Then Remove the Vacation Lock and mark the approximate center position of the bolt.Drill a 1/4-inch hole in your stationary sliding glass door frame for the bolt.
Step 2:
The Vacation Lock provides added security. It may be attached to you sliding glass door at the top or bottom. With the bolt extended and inserted into the drilled hole, position the Vacation Lock onto edge of your sliding glass door and, with a pencil, trace the slots of the Vacation Lock onto the edge of your sliding glass door.
Note: Before drilling, Retract the bolt and make sure there is clearance between the retracted bolt and your stationary door frame. Reposition the Vacation Lock if necessary, to make sure there is clearance but,also making sure that the bolt is still centered on the hole. Drill (2) holes in your sliding glass door using a #32 drill bit, one hole in the center of each of the slots you marked.
Step 3:
Fasten the Vacation Lock to your sliding glass door using (2) #8 X 5/8 round head sheet metal screws.
Warranty
Warranty Type: Limited
Duration: One year from the original delivery date for all products except collar key batteries. Collar key batteries are not covered.
Coverage:
Repair or replacement for products that fail to operate within one year of the original delivery date.
Shipping of repaired or replaced products back to the customer via FedEx Ground or USPS priority mail is covered by High Tech Pet Products.
Exclusions:
Cleaning charges: Products returned dirty or with pet hair will incur a charge equal to 25% of the original purchase price.
Customer is responsible for the cost of shipping the defective product to High Tech Pet Products.
Expedited shipping requests for replacements are at the customer's expense.
All products, including pet doors, must be returned and examined before a replacement unit is sent.