


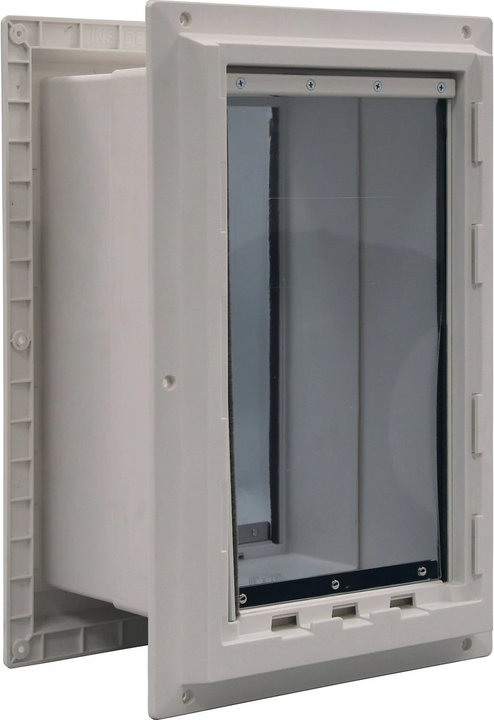
Ideal Pet Products Wall Entry Pet Door


- Insulating double-flap pet door designed for walls 4 ¼” - 9 ¼” inches thick.
- Sturdy plastic tunnel provides protection from the elements.
- Available in medium and extra-large sizes to accommodate various pet sizes.
- Comes with a locking cover for added security and control.
- Easy installation with clear instructions and templates.
 Product Details
Product Details
The Ideal Pet Products Wall Entry Pet Door is an affordable and practical solution for pet owners seeking to provide their furry friends with outdoor access without compromising their home's insulation. The double-flap pet door system, made of flexible vinyl, offers an "air lock" effect, effectively keeping drafts out and maintaining your home's temperature. The clear flaps allow for easy pet training, while the bottom-edge magnets ensure the flaps stay in place when not in use.
Designed to fit walls 4 ¼” to 9 ¼” inches thick, the pet door's plastic tunnel is durable and resistant to the elements. The inner frame is lined with weather-stripping, further enhancing insulation and wind resistance. Available in medium and extra-large sizes, this pet door can accommodate pets up to 26" tall, ensuring a comfortable experience for all.
For added security, the Ideal Pet Products Wall Entry Pet Door comes with a locking cover that can be easily slid in and out on both the inside or outside frames. This feature allows you to control your pet's access to the door or prevent unwanted intruders like wild critters and strays.
Installation is made simple with the included template, making it a great DIY project for those who are handy, or an easy task for a licensed professional. With replacement flaps available, you can ensure the pet door remains functional and efficient for years to come.
Experience the convenience and insulation benefits of the Ideal Pet Products Wall Entry Pet Door, giving your pets the freedom to explore while maintaining the comfort of your home.
Features:
- Clear vinyl flaps with magnets at the bottom edge ensure a secure fit.
- Weather-stripping on the inner frame improves insulation and wind resistance.
- High insulation value for energy efficiency in temperate and three-season climates.
- Replacement flaps available for easy maintenance and upkeep.
- Suitable for cats, small dogs, medium dogs, large dogs, and extra-large dogs.
Benefits:
- Keeps out both heat in the summer and cold in the winter
- The double flap system stands up to the wind while remaining easy for pets to open
- Multiple flap sizes accommodate pets of all sizes
- Template makes for an easy installation
Not the door you're looking for? Check out our other Ideal Pet Door Flaps and Doors.


Size Chart
| Size | Flap Dimension | Rough Cut Out | Recommended Pet Height |
|---|---|---|---|
| Medium | 7 1⁄4" w x 13" h | 8 3/8" w x 15" h | 7" - 19" |
| Extra Large | 9 3⁄4" w x 17" h | 11 1/8 w x 19 1/4" h | 7" - 26" |
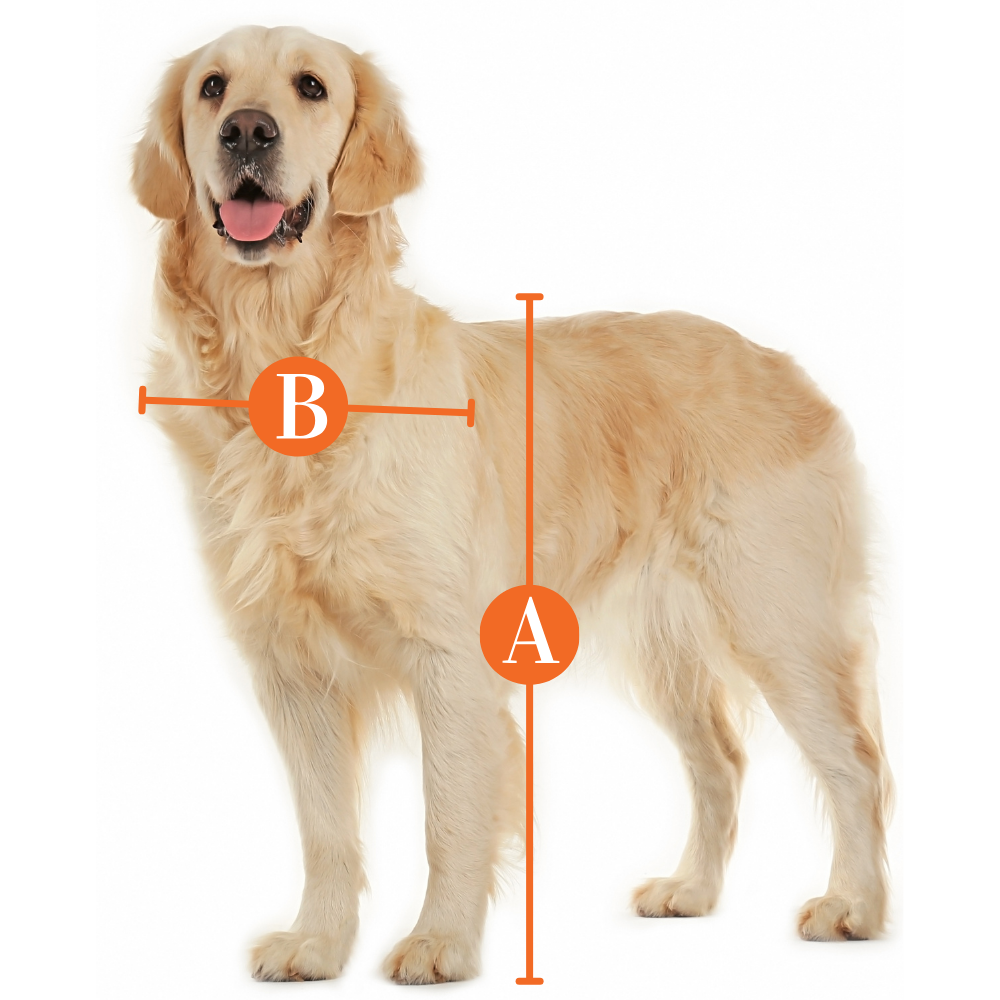
Do not know which flap size to get? Here is a measurement guide to help you out.
Find The Best Pet Door Size For My Pet

A
Pet Height: inches
B
Pet Width: inches
Installation Instructions
 Difficulty
Moderate
Difficulty
Moderate
 Steps
018
Steps
018
 Time Required
1 - 2 hours
Time Required
1 - 2 hours
 Sections
01
Sections
01
 Flags
01
Flags
01
Parts
- Installation Template
- Outer Frame
- Inner Frame
- Locking Cover
Tools
- Tape Measure
- Stud Finder
- Level
- Felt Tipped Marker
- Utility Knife
- Electric Drill with Integrated Top Level
- 3/16”, 1/4” and 3/8” Regular Drill Bits
- 3/16”, 1/4” and 3/8” Masonry Drill Bits
- Electric Saw with Appropriate Blades
- Electric Screwdriver with Phillips Bit
- Hammer or Rubber Mallet
- Safety Goggles
Be sure to read all instructions carefully before installation.
Step 1 Seperate Frames
- After removing the pet door from box, separate the two door frames and remove the die cut “Inside Template”.
Step 2 Find Where to Install
- Using a stud finder, locate wall studs and position inside template as close as possible to center of wall studs (wall studs are typically 16” apart, center-to-center). Measure your pet from floor to shoulder and add 2”.
- Transfer and mark this measurement to the inside wall at the desired placement for your pet door and align top of the “Inside Template” to this mark. Level the “Inside Template” and tape in place
Step 3 Trace Template
- With a felt tipped marker, draw a line all around the inner edges of the “Inside Template” and mark the four 3/8” diameter corner starter holes at each corner then drill the 3/8” diameter corner starter holes at each corner. Remove the template when completed.
Step 4 Cut Inside Wall Opening
- Next, making sure the electric saw is flat and level against the wall, carefully cut out the inside wall opening using the appropriate blade.
- When completed, remove the cutout drywall and any interior wall insulation
Step 5 Place Inside Door Half
- Place the inside door half (with the cardboard “box guide”) into the opening of the inside wall. Level the frame and hold securely.
Step 6 Position Box Guide
- Next, lift the flap (or you can remove the flap completely) and gently push the “box guide” forward until it touches the inside surface of your exterior wall.
Step 7 Drill Guide Hole
- The “box guide” has a 3/8” diameter center hole. Using this hole as a guide and using a 3/8” diameter masonry bit, drill from the inside door half through to the outside wall.
Step 8 Line Up Holes
- Now move to the outside and locate the 3/8” diameter center hole and place the 3/8” dowel (supplied) into the hole.
- Next, locate the “Outside Template” on the outside wall and line-up by placing the 3/8” diameter center hole in the “Outside Template” over the protruding 3/8” dowel.
- Next, level and tape the “Outside Template” in place.
Step 9 Trace Outside Template
- With a felt tipped marker, draw a line all around the “Outside Template” onto the outside wall. Next, using the targets on the paper template as a guide, drill the four 3/8” diameter corner starter holes at each corner through the paper template using an electric drill with a 3/8” masonry bit. Remove the template when completed.
Step 10 Cut Outside Wall Opening
- Next, making sure the electric saw is flat and level against the wall, carefully cut out the outside wall opening using the appropriate blade. When completed, remove the cutout wall material.
Step 11 Insert Outside Door Half
- Place the outside door half into the opening and push through then have another person on the inside to position the inside door half and push the two frames together until both inside and outside frames are flush on both sides.
Step 12 Drill Pilot Holes
- Level the outside door frame and hold securely in place.
- Using the outside door frame holes as a guide, drill a 3/16” pilot hole in each of the six holes.
Step 13 Remove Door Frames
- Remove both inside and outside door frames. At this step, if you are attaching into stucco or cement on the outside wall, replace the outside frame and use the 6 blue masonry screws (supplied) to secure directly into the 3/16” pilot holes.
- When completed, place a plastic insert in each hole and gently tap in place using a hammer or rubber mallet.
Step 14 Secure Outside Door Frame
- Replace the outside door frame back into the opening and secure using the #10 x 1” screws or the blue masonry screws (supplied).
- You may use a different type of inserts and fasteners if desired.
Step 15 Secure Inside Door Frame
- Moving to the inside, replace the inside door frame and hold securely in place. Using the inside door frame holes as a guide, drill a 3/16” pilot hole in each of the six holes.
Step 16 Drill Pilot Holes
- Remove the inside door frame and drill a 1/4” hole at each of the inside door frame pilot holes. When completed, place a plastic insert (supplied) in each hole and gently tap in place using a hammer or rubber mallet.
Step 17 Secure Inside Door Frame
- Replace the inside door frame back into the opening and secure using the using the #10 x 1” screws (supplied). You may use a different type of inserts and fasteners if desired.
Step 18 Add Screw Caps
- Finish the installation by pressing the frame screw caps (supplied) over the holes on the inside and outside frames.
FAQ
|
My Ruff Weather has a label of 10-1/2" x 17" on it. Which flap size should I order? You should order the XL Ruff Weather Replacement Flap (which is marked as 9-3/4" now, although the actual dimension of the flap did not change). |
|
Would small pets sharing with larger pets have an issue with the double flaps? No, the Ideal Ruff Weather Dog Door and Wall Mount Kit is easy for smaller pets to push open even with the double flaps since it only has magnets on the bottom. |
|
What is the tunnel made of? It is very durable plastic. However, we would recommend putting some framing in the cut out to support it on the bottom, especially in the extra-large and super large sizes. |
|
What is the flap made of? The flap is a clear flexible vinyl, 1/8" thick. |
|
How far does the frame stick out? The frame is pretty bulky, more than most doors, and it sticks out about 2 1/2" from the wall. |
|
Is this the same as the Ideal Ruff Weather Dog Door and Wall Kit Combination? They are exactly the same in size, but the flaps on the Designer are tinted and the frame is grey as opposed to the clear flaps and cream color frame on the old style. |
|
Is this easy to install? If you are very handy, it could be a good DIY solo pet door installation. Otherwise, we recommend hiring a licensed pro for all wall installations. |
|
What is the maximum wall thickness for the Ideal Pet Products Ruff Weather Pet Door with Telescoping Frame? The maximum wall thickness is 7 1/4". |
|
How much does shipping cost? Shipping is calculated at checkout. |
Warranty
Superseding Warranty: The provided warranty supersedes any previous warranties, and any existing warranties will now follow the terms of this new warranty.
Duration: There is a One Year Warranty from the purchase date.
Coverage:
The product is warranted to be free from manufacturer’s defects in workmanship and materials.
Only the original purchaser can claim this warranty, and it's non-transferable.
In case of valid claims, defective parts will be replaced at no charge. No refunds are given.
Exclusions:
The product is not waterproof against inclement weather or excessive water exposure.
Warranty is voided by improper installation, intentional misuse, unauthorized repairs, non-compliance with manufacturer's instructions, or commercial use.
The product should be used for domesticated animals only. Damage or defects caused by acts of God, criminal activity, dog abuse, unauthorized entry by non-domestic animals, children's use, or any unintended misuse are not covered.
Customer Reviews

Size Chart
| Size | Flap Dimension | Rough Cut Out | Recommended Pet Height |
|---|---|---|---|
| Medium | 7 1⁄4" w x 13" h | 8 3/8" w x 15" h | 7" - 19" |
| Extra Large | 9 3⁄4" w x 17" h | 11 1/8 w x 19 1/4" h | 7" - 26" |
Do not know which flap size to get? Here is a measurement guide to help you out.
Find The Best Pet Door Size For My Pet
A
Pet Height: inches
B
Pet Width: inches
Installation Instructions
Difficulty
Moderate
Steps
018
Time Required
1 - 2 hours
Sections
01
Flags
01
Parts
- Installation Template
- Outer Frame
- Inner Frame
- Locking Cover
Tools
- Tape Measure
- Stud Finder
- Level
- Felt Tipped Marker
- Utility Knife
- Electric Drill with Integrated Top Level
- 3/16”, 1/4” and 3/8” Regular Drill Bits
- 3/16”, 1/4” and 3/8” Masonry Drill Bits
- Electric Saw with Appropriate Blades
- Electric Screwdriver with Phillips Bit
- Hammer or Rubber Mallet
- Safety Goggles
Be sure to read all instructions carefully before installation.
Step 1 Seperate Frames
- After removing the pet door from box, separate the two door frames and remove the die cut “Inside Template”.
Step 2 Find Where to Install
- Using a stud finder, locate wall studs and position inside template as close as possible to center of wall studs (wall studs are typically 16” apart, center-to-center). Measure your pet from floor to shoulder and add 2”.
- Transfer and mark this measurement to the inside wall at the desired placement for your pet door and align top of the “Inside Template” to this mark. Level the “Inside Template” and tape in place
Step 3 Trace Template
- With a felt tipped marker, draw a line all around the inner edges of the “Inside Template” and mark the four 3/8” diameter corner starter holes at each corner then drill the 3/8” diameter corner starter holes at each corner. Remove the template when completed.
Step 4 Cut Inside Wall Opening
- Next, making sure the electric saw is flat and level against the wall, carefully cut out the inside wall opening using the appropriate blade.
- When completed, remove the cutout drywall and any interior wall insulation
Step 5 Place Inside Door Half
- Place the inside door half (with the cardboard “box guide”) into the opening of the inside wall. Level the frame and hold securely.
Step 6 Position Box Guide
- Next, lift the flap (or you can remove the flap completely) and gently push the “box guide” forward until it touches the inside surface of your exterior wall.
Step 7 Drill Guide Hole
- The “box guide” has a 3/8” diameter center hole. Using this hole as a guide and using a 3/8” diameter masonry bit, drill from the inside door half through to the outside wall.
Step 8 Line Up Holes
- Now move to the outside and locate the 3/8” diameter center hole and place the 3/8” dowel (supplied) into the hole.
- Next, locate the “Outside Template” on the outside wall and line-up by placing the 3/8” diameter center hole in the “Outside Template” over the protruding 3/8” dowel.
- Next, level and tape the “Outside Template” in place.
Step 9 Trace Outside Template
- With a felt tipped marker, draw a line all around the “Outside Template” onto the outside wall. Next, using the targets on the paper template as a guide, drill the four 3/8” diameter corner starter holes at each corner through the paper template using an electric drill with a 3/8” masonry bit. Remove the template when completed.
Step 10 Cut Outside Wall Opening
- Next, making sure the electric saw is flat and level against the wall, carefully cut out the outside wall opening using the appropriate blade. When completed, remove the cutout wall material.
Step 11 Insert Outside Door Half
- Place the outside door half into the opening and push through then have another person on the inside to position the inside door half and push the two frames together until both inside and outside frames are flush on both sides.
Step 12 Drill Pilot Holes
- Level the outside door frame and hold securely in place.
- Using the outside door frame holes as a guide, drill a 3/16” pilot hole in each of the six holes.
Step 13 Remove Door Frames
- Remove both inside and outside door frames. At this step, if you are attaching into stucco or cement on the outside wall, replace the outside frame and use the 6 blue masonry screws (supplied) to secure directly into the 3/16” pilot holes.
- When completed, place a plastic insert in each hole and gently tap in place using a hammer or rubber mallet.
Step 14 Secure Outside Door Frame
- Replace the outside door frame back into the opening and secure using the #10 x 1” screws or the blue masonry screws (supplied).
- You may use a different type of inserts and fasteners if desired.
Step 15 Secure Inside Door Frame
- Moving to the inside, replace the inside door frame and hold securely in place. Using the inside door frame holes as a guide, drill a 3/16” pilot hole in each of the six holes.
Step 16 Drill Pilot Holes
- Remove the inside door frame and drill a 1/4” hole at each of the inside door frame pilot holes. When completed, place a plastic insert (supplied) in each hole and gently tap in place using a hammer or rubber mallet.
Step 17 Secure Inside Door Frame
- Replace the inside door frame back into the opening and secure using the using the #10 x 1” screws (supplied). You may use a different type of inserts and fasteners if desired.
Step 18 Add Screw Caps
- Finish the installation by pressing the frame screw caps (supplied) over the holes on the inside and outside frames.
FAQ
|
My Ruff Weather has a label of 10-1/2" x 17" on it. Which flap size should I order? You should order the XL Ruff Weather Replacement Flap (which is marked as 9-3/4" now, although the actual dimension of the flap did not change). |
|
Would small pets sharing with larger pets have an issue with the double flaps? No, the Ideal Ruff Weather Dog Door and Wall Mount Kit is easy for smaller pets to push open even with the double flaps since it only has magnets on the bottom. |
|
What is the tunnel made of? It is very durable plastic. However, we would recommend putting some framing in the cut out to support it on the bottom, especially in the extra-large and super large sizes. |
|
What is the flap made of? The flap is a clear flexible vinyl, 1/8" thick. |
|
How far does the frame stick out? The frame is pretty bulky, more than most doors, and it sticks out about 2 1/2" from the wall. |
|
Is this the same as the Ideal Ruff Weather Dog Door and Wall Kit Combination? They are exactly the same in size, but the flaps on the Designer are tinted and the frame is grey as opposed to the clear flaps and cream color frame on the old style. |
|
Is this easy to install? If you are very handy, it could be a good DIY solo pet door installation. Otherwise, we recommend hiring a licensed pro for all wall installations. |
|
What is the maximum wall thickness for the Ideal Pet Products Ruff Weather Pet Door with Telescoping Frame? The maximum wall thickness is 7 1/4". |
|
How much does shipping cost? Shipping is calculated at checkout. |
Warranty
Superseding Warranty: The provided warranty supersedes any previous warranties, and any existing warranties will now follow the terms of this new warranty.
Duration: There is a One Year Warranty from the purchase date.
Coverage:
The product is warranted to be free from manufacturer’s defects in workmanship and materials.
Only the original purchaser can claim this warranty, and it's non-transferable.
In case of valid claims, defective parts will be replaced at no charge. No refunds are given.
Exclusions:
The product is not waterproof against inclement weather or excessive water exposure.
Warranty is voided by improper installation, intentional misuse, unauthorized repairs, non-compliance with manufacturer's instructions, or commercial use.
The product should be used for domesticated animals only. Damage or defects caused by acts of God, criminal activity, dog abuse, unauthorized entry by non-domestic animals, children's use, or any unintended misuse are not covered.