Hale Screen Mounted Pet Doors Stabilizer Bar Kit
- Regular price
- $89.00
- Sale price
- $89.00
- Regular price
-
- Unit price
- per
- Enhances stability for Hale Screen Mounted Pet Doors
- Designed for active pets and larger door sizes
- Comes in a 48" length, trimmable for a custom fit
- Available in 4 colors to match your existing frame
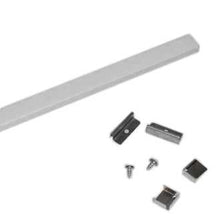
- Kit includes spreader bar, 2 aluminum clips, and 2 metal screen retainers

Product Details
The Hale Screen Mounted Pet Doors Stabilizer Bar Kit is designed to reinforce your screen door with a pet door installed. This stabilization kit ensures your screen door remains sturdy and intact, making it an ideal addition for households with active pets or larger door sizes. The stabilizer bar runs horizontally across the top of the screen pet door, providing extra support and safeguarding it from wear and tear.
This kit comes in a 48" length, allowing you to trim it for a custom fit on your screen door. It is available in 4 different colors, ensuring it seamlessly matches your existing door frame. The complete kit includes a spreader bar, 2 aluminum clips, and 2 metal screen retainers, providing all the components needed for secure installation.
The stabilizer bar enables the pet door to hold firmly to the screen door, ensuring it stays in place even with regular use.
The Hale Screen Mounted Pet Doors Stabilizer Bar Kit delivers an effective solution to enhance the durability and stability of your pet door, making it a valuable addition to your home.
Not the part you're looking for? Check out our full list of Hale pet doors and parts.
Features:
- Reinforces your screen door with pet door installed
- Designed to support pet doors for active pets and larger breeds
- Easy to trim 48" length allows for a perfect fit on your screen door
- Available in 4 colors to seamlessly match your existing door frame
- Complete kit with spreader bar, aluminum clips, and metal screen retainers for secure installation
Installation Instructions

 Difficulty
Moderate
 Steps
10
 Time Required
1 hour
 Sections
01
 Flags
01
Parts
- Spreader Bar
- 2 Aluminum Clips
- 2 Metal Screen Retainers
Tools
- Pencil
- Tape Measure
- Hacksaw
- Spline Roller
- Screwdriver
- Drop Cloths
Step 1 Install the Screen Pet Door
- Install the screen door according to the instructions provided with the screen mount pet door.
- The stabilizer kit can either be installed at the same time as the pet door or retrofitted to an existing pet door.
- If it is being installed at the time of the screen door installation, we recommend leaving some excess screen mesh material during installation.
- It can be trimmed after the stabilizer bar installation is complete.
Step 2 Cut the Stabilizer Bar
- Measure the width of the screen door from the side containing the screen spline.
- This measurement should be the visible opening between the screen frames.
- Using this measurement, measure and mark this distance on the stabilizer bar.
- Cut the stabilizer bar to the proper length. It is easiest to accomplish this with a hacksaw.
- After cutting the bar to the appropriate length, make sure to deburr the cut to allow the aluminum clip to fit in properly.
- Test-fit the bar to the screen door frame to check for the proper width. Re-cut the bar shorter if needed.
Step 3 Remove Spline
- On the side of the screen door containing the pet door, carefully pull a short amount of screen spline out of the screen spline flame or raceway directly above the pet door with a screwdriver.
- Repeat the process on the other side of the screen door at approximately the same height above the pet door.
- Make sure not to scratch the finish of the screen door or poke a hole in the screen mesh fabric when removing the screen spline. Do not pull out too long of a distance of screen spline, as it will be more difficult to push back in place later.
Step 4 Attach the Clips
- Making sure that both clips face the correct direction to fit over the screen door raceway, carefully slide one aluminum clip into each end of the spreader bar.
- Make sure not to push them too far into the spreader bar because there might not be enough clearance for the raceway.
Step 5 Install the Spreader Bar
- The spreader bar is installed on the side of the screen mesh opposite of the spline.
- On the same side of the screen fabric as the pet door, carefully insert the spreader bar into the frame opening of the screen door, sliding the curved portion of the aluminum clips over and onto the edge of the raceway on the screen door.
- Depending on what type of screen door in which you are installing (i.e., a sliding screen door on a patio door), you may have to work at getting one end of the spreader bar positioned correctly.
- If it is easier to complete the installation and then put the screen spline back in place, feel free to do so.
Step 6 Install the Spreader Bar
- The spreader bar is installed on the side of the screen mesh opposite of the spline.
- On the same side of the screen fabric as the pet door, carefully insert the spreader bar into the frame opening of the screen door, sliding the curved portion of the aluminum clips over and onto the edge of the raceway on the screen door.
- Depending on what type of screen door in which you are installing (i.e., a sliding screen door on a patio door), you may have to work at getting one end of the spreader bar positioned correctly.
- If it is easier to complete the installation and then put the screen spline back in place, feel free to do so.
Step 7 Push Spline Back In Place
- Making sure the screen mesh is taut, carefully push the screen spline back into place.
- The easiest method for this is to use a screen spline roller. However, you can use a screwdriver or other flat tool to accomplish this if you do not have a screen spline roller.
- The pressure from the screen spline against the edges of the screen raceway will hold the aluminum clip firmly in place against the screen frame on both edges.
Step 8 Attach Retainer Rings
- Slide one metal retainer over the top edge of the pet door screen spline frame. This retainer should be close to the outer corner of the pet door.
- Slide the second metal retainer onto the pet door frame approximately halfway between the exterior corner and the edge of the pet door attached to the screen door. This second retainer will provide added stability, but its positioning is not critical. Anywhere along the top edge of the pet door is acceptable.
- If desired, you can attach the retainers on the top edge near each corner. The exact placement depends on your screen door and the size of pet door you are installing.
- When you are satisfied with the placement of the retainers, carefully push the spreader bar down flush against the top of the pet door.
- The edge of the retainer clip with the hole should be alongside the edge of the spreader bar parallel to the pet door.
Step 9 Attach the Clips
- Option 1: If you did not press the screen spline back into place (step 8), carefully pull the screen fabric upwards and out of the way to install the screws. Then pull the screen mesh back down to cover the area and install the spline.
- Option 2: You can screw directly through the screen mesh fabric to attach the clips.
Step 10 Check Installation
- Check the overall installation, making sure that everything is straight and level, as well as confirming that the screen mesh is taut.
- Double check that the screen spline is pushed securely back into place on both sides of the screen door, as well as along the top edge of the pet door.
- If this is a new installation and you did not previously trim the screen mesh fabric close to the pet door, do so at this time.
- Remove the drop cloths and do any necessary cleanup. Clean the pet door frame and flaps if needed.
Warranty
Warranty: Lifetime Frame Warranty / 10-Year Parts Warranty Including Flaps
Duration: Lifetime for frame and 10 years for parts including flaps.
Coverage:
Hale Pet Door products and components are guaranteed to be free from defects in materials and workmanship from the date of purchase.
Flaps are made from the best vinyl imported from France using Hale's custom chemical recipe.
Coverage percentages for parts (excluding frame) decreases by 20% every two years over a ten year period.
Returns within 30 days due to dissatisfaction results in a full refund, but if the product is damaged upon return, only 50% credit is provided.
Exclusions:
Warranty does not include shipping to Hale Pet Door or field service labor.
Glass Breakage: 50% replacement cost in the first year if the glass breaks. No warranty on glass after the first year. Excludes in-glass models' glass.
Only 50% credit is provided towards the cost of a replacement Hale Pet Door if damaged due to no fault of Hale Pet Door (e.g., miscutting, mismeasuring) within 30 days of purchase.
Customer Reviews

Installation Instructions

 Difficulty
Moderate
 Steps
10
 Time Required
1 hour
 Sections
01
 Flags
01
Parts
- Spreader Bar
- 2 Aluminum Clips
- 2 Metal Screen Retainers
Tools
- Pencil
- Tape Measure
- Hacksaw
- Spline Roller
- Screwdriver
- Drop Cloths
Step 1 Install the Screen Pet Door
- Install the screen door according to the instructions provided with the screen mount pet door.
- The stabilizer kit can either be installed at the same time as the pet door or retrofitted to an existing pet door.
- If it is being installed at the time of the screen door installation, we recommend leaving some excess screen mesh material during installation.
- It can be trimmed after the stabilizer bar installation is complete.
Step 2 Cut the Stabilizer Bar
- Measure the width of the screen door from the side containing the screen spline.
- This measurement should be the visible opening between the screen frames.
- Using this measurement, measure and mark this distance on the stabilizer bar.
- Cut the stabilizer bar to the proper length. It is easiest to accomplish this with a hacksaw.
- After cutting the bar to the appropriate length, make sure to deburr the cut to allow the aluminum clip to fit in properly.
- Test-fit the bar to the screen door frame to check for the proper width. Re-cut the bar shorter if needed.
Step 3 Remove Spline
- On the side of the screen door containing the pet door, carefully pull a short amount of screen spline out of the screen spline flame or raceway directly above the pet door with a screwdriver.
- Repeat the process on the other side of the screen door at approximately the same height above the pet door.
- Make sure not to scratch the finish of the screen door or poke a hole in the screen mesh fabric when removing the screen spline. Do not pull out too long of a distance of screen spline, as it will be more difficult to push back in place later.
Step 4 Attach the Clips
- Making sure that both clips face the correct direction to fit over the screen door raceway, carefully slide one aluminum clip into each end of the spreader bar.
- Make sure not to push them too far into the spreader bar because there might not be enough clearance for the raceway.
Step 5 Install the Spreader Bar
- The spreader bar is installed on the side of the screen mesh opposite of the spline.
- On the same side of the screen fabric as the pet door, carefully insert the spreader bar into the frame opening of the screen door, sliding the curved portion of the aluminum clips over and onto the edge of the raceway on the screen door.
- Depending on what type of screen door in which you are installing (i.e., a sliding screen door on a patio door), you may have to work at getting one end of the spreader bar positioned correctly.
- If it is easier to complete the installation and then put the screen spline back in place, feel free to do so.
Step 6 Install the Spreader Bar
- The spreader bar is installed on the side of the screen mesh opposite of the spline.
- On the same side of the screen fabric as the pet door, carefully insert the spreader bar into the frame opening of the screen door, sliding the curved portion of the aluminum clips over and onto the edge of the raceway on the screen door.
- Depending on what type of screen door in which you are installing (i.e., a sliding screen door on a patio door), you may have to work at getting one end of the spreader bar positioned correctly.
- If it is easier to complete the installation and then put the screen spline back in place, feel free to do so.
Step 7 Push Spline Back In Place
- Making sure the screen mesh is taut, carefully push the screen spline back into place.
- The easiest method for this is to use a screen spline roller. However, you can use a screwdriver or other flat tool to accomplish this if you do not have a screen spline roller.
- The pressure from the screen spline against the edges of the screen raceway will hold the aluminum clip firmly in place against the screen frame on both edges.
Step 8 Attach Retainer Rings
- Slide one metal retainer over the top edge of the pet door screen spline frame. This retainer should be close to the outer corner of the pet door.
- Slide the second metal retainer onto the pet door frame approximately halfway between the exterior corner and the edge of the pet door attached to the screen door. This second retainer will provide added stability, but its positioning is not critical. Anywhere along the top edge of the pet door is acceptable.
- If desired, you can attach the retainers on the top edge near each corner. The exact placement depends on your screen door and the size of pet door you are installing.
- When you are satisfied with the placement of the retainers, carefully push the spreader bar down flush against the top of the pet door.
- The edge of the retainer clip with the hole should be alongside the edge of the spreader bar parallel to the pet door.
Step 9 Attach the Clips
- Option 1: If you did not press the screen spline back into place (step 8), carefully pull the screen fabric upwards and out of the way to install the screws. Then pull the screen mesh back down to cover the area and install the spline.
- Option 2: You can screw directly through the screen mesh fabric to attach the clips.
Step 10 Check Installation
- Check the overall installation, making sure that everything is straight and level, as well as confirming that the screen mesh is taut.
- Double check that the screen spline is pushed securely back into place on both sides of the screen door, as well as along the top edge of the pet door.
- If this is a new installation and you did not previously trim the screen mesh fabric close to the pet door, do so at this time.
- Remove the drop cloths and do any necessary cleanup. Clean the pet door frame and flaps if needed.
Warranty
Warranty: Lifetime Frame Warranty / 10-Year Parts Warranty Including Flaps
Duration: Lifetime for frame and 10 years for parts including flaps.
Coverage:
Hale Pet Door products and components are guaranteed to be free from defects in materials and workmanship from the date of purchase.
Flaps are made from the best vinyl imported from France using Hale's custom chemical recipe.
Coverage percentages for parts (excluding frame) decreases by 20% every two years over a ten year period.
Returns within 30 days due to dissatisfaction results in a full refund, but if the product is damaged upon return, only 50% credit is provided.
Exclusions:
Warranty does not include shipping to Hale Pet Door or field service labor.
Glass Breakage: 50% replacement cost in the first year if the glass breaks. No warranty on glass after the first year. Excludes in-glass models' glass.
Only 50% credit is provided towards the cost of a replacement Hale Pet Door if damaged due to no fault of Hale Pet Door (e.g., miscutting, mismeasuring) within 30 days of purchase.


 Product Details

