


High Tech Armor Flex Pet Door for Walls
- Regular price
- $389.99
- Sale price
- $389.99
- Regular price
-
- Unit price
- per


- Energy-efficient Armor Flex Pet Door for Walls with a flexible flap and a magnetic airtight seal.
- Quiet flap that is made of multiple horizontal plastic slats with magnets.
- Heavy-gauge aluminum-framed panel for durable and sturdy installation, fitting walls 3 1/4" - 7" thick.
- Secure locking cover included for additional safety and security.
- Unique interlocking segment flap design ensures insulation and weather resistance.
- Available in sizes small to extra large, accommodating various pet sizes and breeds.
 Product Details
Product Details
Upgrade your home with the High Tech Armor Flex Pet Door for Walls, an energy-efficient in-wall pet door that combines functionality with an elegant design. This Armor Flex Dog Door is constructed with a premium aluminum frame, providing a long-lasting, sturdy installation that fits walls 3 1/4" to 7" thick. The unique interlocking segment flap design ensures insulation and weather resistance, keeping your home comfortable and protected year-round.
The Armor Flex Pet Door features a flexible flap made from high-strength ABS composite, allowing for easy and safe use by pets of all sizes. The flap sides are lined with a matrix of rare earth magnets, ensuring a tight seal against high winds and extreme weather conditions. This airtight dog door also comes with a secure slide-in locking cover for added security when not in use or while you're away.
Available in sizes ranging from small to extra large, the Armor Flex Dog Door accommodates pets of various sizes and breeds, making it a versatile and convenient addition to any home. The durable aluminum framing and tunnel construction ensure long-lasting build quality that stands up to frequent use and the elements. The Armor Flex Air Tight Pet Door is finished with a scratch-resistant powder coating, maintaining its beauty for years to come.
Invest in the Armor Flex Dog Door for an energy-efficient, stylish, and secure pet access solution that caters to the needs of both you and your beloved pets.
Features:
- Matrix of rare earth magnets along the flap sides for optimal wind and weather resistance.
- Innovative flap design made from high-strength ABS composite for energy efficiency and durability.
- Flexible flap ensures safety and easy use for pets of all sizes.
- Aluminum framing and tunnel construction provide long-lasting build quality and resilience.
- Secure slide-in locking cover for added security when not in use or when away from home.
Benefits:
- Energy-efficient design ensures that your home stays insulated year-round.
- Flexible flap is safe to use.
- Larger sizes allow pets of differing sizes to share the pet door.
- Built to last a lifetime.


Size Chart
- Small 6.38"w x 13.5"h
- Medium 8.25"w x 17.25"h
- Large 10.5"w x 21.25"h
- Extra Large 12.5"w x 25"h
Flap Dimensions:
6.38"w x 13.5"h
The entry way your dog goes through.Outside Frame Dimensions
10.88"w x 17.75"h
The outer edge of the pet door.


Rough Cut Out:
9.38"w x 16.31"h
The size of the hole needed to fit your pet door into your door.Flap Dimensions:
8.25"w x 17.25"h
The entry way your dog goes through.Outside Frame Dimensions
13.5"w x 22"h
The outer edge of the pet door.


Rough Cut Out:
11.25"w x 20"h
The size of the hole needed to fit your pet door into your door.Flap Dimensions:
10.5"w x 21.25"h
The entry way your dog goes through.Outside Frame Dimensions
14.88"w x 25.5"h
The outer edge of the pet door.


Rough Cut Out:
13.38"w x 24"h
The size of the hole needed to fit your pet door into your door.Flap Dimensions:
12.5"w x 25"h
The entry way your dog goes through.Outside Frame Dimensions
17"w x 29.25"h
The outer edge of the pet door.


Rough Cut Out:
15.5"w x 27.88"h
The size of the hole needed to fit your pet door into your door.| Size | Flap Dimensions | Rough Cutout Dimensions | Outside Frame Dimensions | Recommended Pet Height |
|---|---|---|---|---|
| Small | 6.38" x 13.5" | 9.38" x 16.31" | 10.88" x 17.75" | 12" - 19" |
| Medium | 8.25" x 17.25" | 11.25" x 20" | 13.5" x 22" | 12" - 25" |
| Large | 10.5" x 21.25" | 13.38" x 24" | 14.88" x 25.5" | 12" - 31" |
| Extra-Large | 12.5" x 25" | 15.5" x 27.88" | 17" x 29.25" | 12" - 38" |
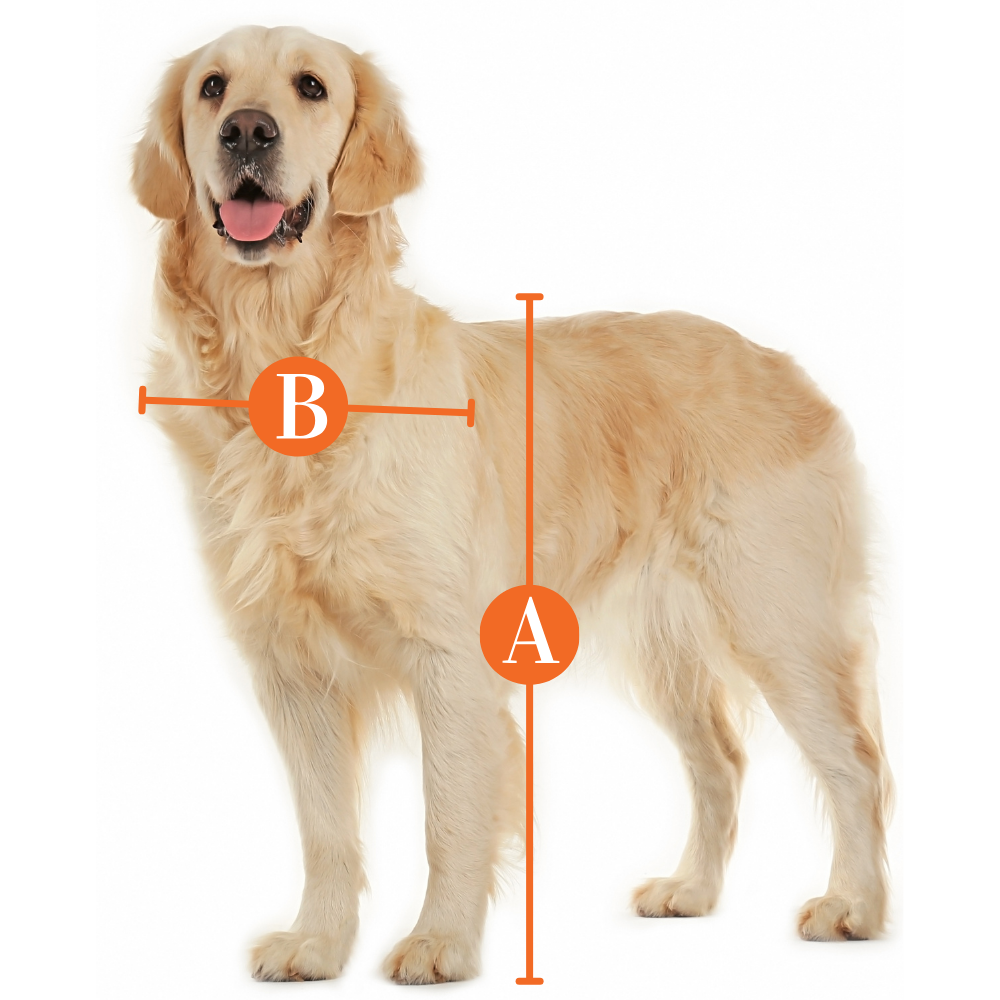
Find The Best Pet Door Size For My Pet

A
Pet Height: inches
B
Pet Width: inches
Installation Instructions

 Difficulty
High
Difficulty
High
 Steps
07
Steps
07
 Time Required
2-3 hours
Time Required
2-3 hours
 Sections
01
Sections
01
 Flags
00
Flags
00
Parts
- Main Door Assembly with Aluminum Wall Tunnel
- Outside Bezel
- Security Panel
- #10 X 1-1/4” Long, Phillips Oval Head, Stainless Steel Mounting Screws (Small, 22; Medium, 26; Large, 32; Extra Large, 32)
- Screw Anchors for screws above (Small, 22; Medium, 26; Large, 32; Extra Large, 32)
Tools
- #1 Philips screwdriver
- Circular saw (for stucco walls use a masonry blade)
- Electric drill
- 1/4” drill bit (for drywall and stucco installations)
- Level
- Safety glasses
Step 1 Measure Your Dog's Height

- Measure your dog’s shoulder height.
- The top of your rough cut-out should be 4” higher than your dog’s shoulder height such that the bottom of your rough cut-out is at least 3” above the floor (see Figure 1).
- Position your cut-out to the higher of the two conditions.
Step 2 Mark the Rough Cutout

- Using a level for the top edge, draw the rough cut-out rectangle on your wall using the chart pictured.
Step 3 Cut the Opening

- Use a circular saw to cut out the opening.
- For stucco walls use a masonry saw blade.
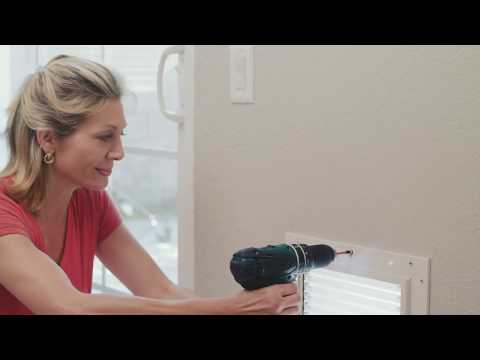
Step 4 Drill the Outside Mounting Holes
- Place the bezel in the opening you cut in the outside of your wall.
- Then, trace each mounting hole circle with a pencil.
- Remove the bezel and drill a mounting hole in the center of each circle you traced.
- The screw anchors included are recommended for stucco and drywall.
- If you are planning to use the screw anchors, drill the holes with a 1⁄4” drill bit.
- For stucco, insert a screw anchor in each hole on the outside of your wall.
Step 5 Install the Main Assembly
- Reinstall the bezel and screw it into place using the Mounting Screws provided.
- With the bezel in place, insert the Main Door Assembly into inside of the opening you made in your wall.
- Then, trace each mounting hole circle with a pencil.
Step 6 Insert Screw Anchors
- Remove the Main Door Assembly and drill a mounting hole in the center of each circle you traced.
- Use a 1⁄4” drill bit if you are using the screw anchors.
- Insert a screw anchor into each hole.
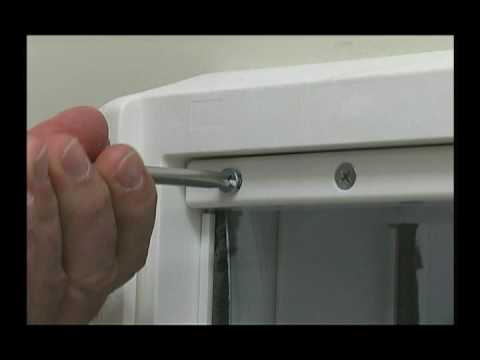
Step 7 Secure the Main Door Assembly
- Reinstall the Main Door Assembly and screw it into place using the Mounting Screws provided.
- Insert the Security Panel into the Main Door Assembly.
Videos
FAQ
|
Are replacement flaps available? Currently, we do not carry any replacement flaps for this door. You would need to go to the manufacturer’s website to order them. |
|
Are these electronic pet flaps? Unlike the rest of High Tech Pet Doors’ products, the Armor Flex pet door is not an electronic smart door. It is a traditional pet flap that is opened by the pet pushing it open. |
|
Are there color options other than white? No, but you can paint the frames with speciality paint from your local hardware store. |
|
Can a large dog & cat use the same door flaps? We recommend getting dogs and cats different doors. While the flap is lightweight, it is sealed shut with non-removable magnetic, which may make it hard for a cat to push open. If you need an in-wall pet door with removable magnets, we recommend checking out the Endura Flap Pet Door for Walls. |
|
Do I need to buy separate wall tunnels for this door? No, this comes with a tunnel that can fit into walls up to 7” thick. If your wall is thicker than 7” or the tunnel that came with your door is damaged, you may need to purchase a new tunnel. The wall tunnels can also be used to convert an Armor Flex Pet Door for Doors into an in-wall pet flap. |
|
How do I know what size is best for my dog? When installing the Armor Flex wall door you want it to clear the top of your dog's back by 1-2 inches, minimum. You also want the step over to be comfortable. Lastly you want the width to allow your pet to go through without touching the sides. Here's a measurement guide with tips on how to determine the correct size. |
|
How much does shipping cost? Shipping is calculated at checkout. |
Warranty
Warranty Type: Limited
Duration: One year from the original delivery date.
Coverage:
Repair or replacement for products that fail to operate within one year of the original delivery date.
Shipping of repaired or replaced products back to the customer via FedEx Ground or USPS priority mail is covered by High Tech Pet Products.
Exclusions:
Cleaning charges: Products returned dirty or with pet hair will incur a charge equal to 25% of the original purchase price.
Customer is responsible for the cost of shipping the defective product to High Tech Pet Products.
Expedited shipping requests for replacements are at the customer's expense.
All products, including pet doors, must be returned and examined before a replacement unit is sent.
Customer Reviews
Size Chart
- Small 6.38"w x 13.5"h
- Medium 8.25"w x 17.25"h
- Large 10.5"w x 21.25"h
- Extra Large 12.5"w x 25"h
Flap Dimensions:
6.38"w x 13.5"h
The entry way your dog goes through.Outside Frame Dimensions
10.88"w x 17.75"h
The outer edge of the pet door. Rough Cut Out:
9.38"w x 16.31"h
The size of the hole needed to fit your pet door into your door.Flap Dimensions:
8.25"w x 17.25"h
The entry way your dog goes through.Outside Frame Dimensions
13.5"w x 22"h
The outer edge of the pet door. Rough Cut Out:
11.25"w x 20"h
The size of the hole needed to fit your pet door into your door.Flap Dimensions:
10.5"w x 21.25"h
The entry way your dog goes through.Outside Frame Dimensions
14.88"w x 25.5"h
The outer edge of the pet door. Rough Cut Out:
13.38"w x 24"h
The size of the hole needed to fit your pet door into your door.Flap Dimensions:
12.5"w x 25"h
The entry way your dog goes through.Outside Frame Dimensions
17"w x 29.25"h
The outer edge of the pet door. Rough Cut Out:
15.5"w x 27.88"h
The size of the hole needed to fit your pet door into your door.| Size | Flap Dimensions | Rough Cutout Dimensions | Outside Frame Dimensions | Recommended Pet Height |
|---|---|---|---|---|
| Small | 6.38" x 13.5" | 9.38" x 16.31" | 10.88" x 17.75" | 12" - 19" |
| Medium | 8.25" x 17.25" | 11.25" x 20" | 13.5" x 22" | 12" - 25" |
| Large | 10.5" x 21.25" | 13.38" x 24" | 14.88" x 25.5" | 12" - 31" |
| Extra-Large | 12.5" x 25" | 15.5" x 27.88" | 17" x 29.25" | 12" - 38" |
Find The Best Pet Door Size For My Pet
A
Pet Height: inches
B
Pet Width: inches
Installation Instructions
Difficulty
High
Steps
07
Time Required
2-3 hours
Sections
01
Flags
00
Parts
- Main Door Assembly with Aluminum Wall Tunnel
- Outside Bezel
- Security Panel
- #10 X 1-1/4” Long, Phillips Oval Head, Stainless Steel Mounting Screws (Small, 22; Medium, 26; Large, 32; Extra Large, 32)
- Screw Anchors for screws above (Small, 22; Medium, 26; Large, 32; Extra Large, 32)
Tools
- #1 Philips screwdriver
- Circular saw (for stucco walls use a masonry blade)
- Electric drill
- 1/4” drill bit (for drywall and stucco installations)
- Level
- Safety glasses
Step 1 Measure Your Dog's Height
- Measure your dog’s shoulder height.
- The top of your rough cut-out should be 4” higher than your dog’s shoulder height such that the bottom of your rough cut-out is at least 3” above the floor (see Figure 1).
- Position your cut-out to the higher of the two conditions.
Step 2 Mark the Rough Cutout
- Using a level for the top edge, draw the rough cut-out rectangle on your wall using the chart pictured.
Step 3 Cut the Opening
- Use a circular saw to cut out the opening.
- For stucco walls use a masonry saw blade.
Step 4 Drill the Outside Mounting Holes
- Place the bezel in the opening you cut in the outside of your wall.
- Then, trace each mounting hole circle with a pencil.
- Remove the bezel and drill a mounting hole in the center of each circle you traced.
- The screw anchors included are recommended for stucco and drywall.
- If you are planning to use the screw anchors, drill the holes with a 1⁄4” drill bit.
- For stucco, insert a screw anchor in each hole on the outside of your wall.
Step 5 Install the Main Assembly
- Reinstall the bezel and screw it into place using the Mounting Screws provided.
- With the bezel in place, insert the Main Door Assembly into inside of the opening you made in your wall.
- Then, trace each mounting hole circle with a pencil.
Step 6 Insert Screw Anchors
- Remove the Main Door Assembly and drill a mounting hole in the center of each circle you traced.
- Use a 1⁄4” drill bit if you are using the screw anchors.
- Insert a screw anchor into each hole.
Step 7 Secure the Main Door Assembly
- Reinstall the Main Door Assembly and screw it into place using the Mounting Screws provided.
- Insert the Security Panel into the Main Door Assembly.
Videos
FAQ
|
Are replacement flaps available? Currently, we do not carry any replacement flaps for this door. You would need to go to the manufacturer’s website to order them. |
|
Are these electronic pet flaps? Unlike the rest of High Tech Pet Doors’ products, the Armor Flex pet door is not an electronic smart door. It is a traditional pet flap that is opened by the pet pushing it open. |
|
Are there color options other than white? No, but you can paint the frames with speciality paint from your local hardware store. |
|
Can a large dog & cat use the same door flaps? We recommend getting dogs and cats different doors. While the flap is lightweight, it is sealed shut with non-removable magnetic, which may make it hard for a cat to push open. If you need an in-wall pet door with removable magnets, we recommend checking out the Endura Flap Pet Door for Walls. |
|
Do I need to buy separate wall tunnels for this door? No, this comes with a tunnel that can fit into walls up to 7” thick. If your wall is thicker than 7” or the tunnel that came with your door is damaged, you may need to purchase a new tunnel. The wall tunnels can also be used to convert an Armor Flex Pet Door for Doors into an in-wall pet flap. |
|
How do I know what size is best for my dog? When installing the Armor Flex wall door you want it to clear the top of your dog's back by 1-2 inches, minimum. You also want the step over to be comfortable. Lastly you want the width to allow your pet to go through without touching the sides. Here's a measurement guide with tips on how to determine the correct size. |
|
How much does shipping cost? Shipping is calculated at checkout. |
Warranty
Warranty Type: Limited
Duration: One year from the original delivery date.
Coverage:
Repair or replacement for products that fail to operate within one year of the original delivery date.
Shipping of repaired or replaced products back to the customer via FedEx Ground or USPS priority mail is covered by High Tech Pet Products.
Exclusions:
Cleaning charges: Products returned dirty or with pet hair will incur a charge equal to 25% of the original purchase price.
Customer is responsible for the cost of shipping the defective product to High Tech Pet Products.
Expedited shipping requests for replacements are at the customer's expense.
All products, including pet doors, must be returned and examined before a replacement unit is sent.